Saturday 29 August 2015

Papercraft Embroidery Hoop


Hello.
Today I am sharing something a little different with you.  As with many crafting prodcucts they can be mixed and matched and so this project I have used a standard embroidery hoop to create a wall hanging.  The natural look of the hessian is a perfect combination with the Into The Woods Collection.

Materials:
Embroidery Hoop
Hessian
Mount Board
Felt
Distress Ink 

Instructions:
1.  Take the embroidery hoop and open it up.  Place the hessian material inside and pull tight.


2.  Die cut the Sizzix Bigz Die - Wonderland Bird from mount board and again from felt.  Adhere the layers together.


3. Trim 2 layers of patterned papers from the 6 x 6" Into The woods Paper Pad.  Cut one into a banner.  Attach to the hessian.  Adhere a 1" strip along the base of the banner and add the ribbon.


3.  Die cut the Sizzix Thinlits Die Set Woodland Flower and Woodland leaves.  Ink the edges an adhere.


4.  Finally adhere the bird to the hessian.


A great project to give as a gift or add a little colour to your home decor.

Have a great weekend.

Katie 


Monday 24 August 2015

How to make your die cut letters glued in perfect position

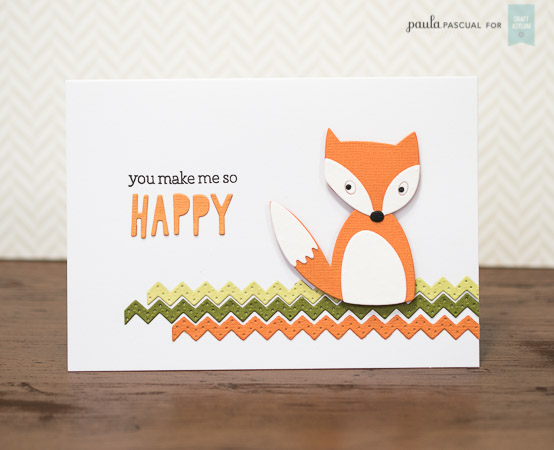
Today I am sharing a card featuring the super cute Fox!


I used:


And I am going to show you how to make sure that the letters stay in the right place while gluing them.


First stamp on the card. I decided to change the sentiment for this step by step to showcase that you how versatile this die is.


Then use your Big Shot to die cit the sentiment using the Happiness Phrases Happy.


Remove the excess card, and apply the tiniest amount of glue posible, a good way to do so is by using a cocktail stick to apply tiny dots of glue.


Place the die in place and secure it if you would like with low tack tape.


Then use a clean cocktail stick to push through gently each of the letters.


Then, lift the die gently just in case the glue hasn't bonded.


Perfectly spaced!


Just make sure that there is no glue left on the die! If there is, just use a damp cloth to remove it.


I hope you like this tip and the card!


Saturday 22 August 2015

You Make Me Happy Card


Hello ...

Today I would like to share a bright and cheerful card with you.

I have used the Candy collection of papers to create a clean and modern look.  The plain papers in the Candy 6 x 6" Paper Pad are perfect for making up die cuts as it really helps them stand out from the white background.

The Sizzix Thinlits Happy Birds Die has been cut from several colours and pieced together to create a statement piece in the corner of the card.


This has been adhered to a white panel.  To set off the image a layer of pink paper from the Candy 12 x12" Paper Pad has been adhered to the edge and a strip of twine added.  Adhesive stones have been adhered to the bird to add some detail.

The white layer has then been added to a 7 x 7" card blank using 3D foam pads to create dimension.

This can be used for any occasion.  In fact I am going to use it as an anniversary card for my husband!

Have a lovely weekend.

Katie


Saturday 15 August 2015

Christmas Made Simple


Hello

Today I am sharing something a little different with you.  I am a huge fan of patterned paper and my designs often feature bold prints but today I wanted to share some simple Christmas cards made with a few basic colours.

Christmas can be a busy time and with so many cards to send we sometimes need a few quick and simple ideas.  This of course is where die cutting comes into its own as you can batch make lots of cards easily but still with a very professional finish.

These cards have been made with simple colours that co-ordinate beautifully.  The Kraft card gives a modern look but added to the red and white keeps a traditional element too.

The first card is made using the Sizzix Bigz Die - Loving Bear By craft Asylum.  He is such a cute little guy and can be used on any winter projects.   The heart border from the Sizzix Thinlits Die Set - Decorative Trim #2 By Craft Asylum adds some colour to the design.  The sentiment is small but fits perfectly in with this design.  That has been created using the Sizzix thinlits Die set - Warm winter Wishes By Craft asylum.


The second card features the Sizzix Bigz Die - Wonderland Bird By Craft Asylum.  Such a great die to use for any occasion.  I love him cute out of Kraft card and with the small sentiment cut from the Sizzix Thinlits Die Set - Warm Winter Wishes in Black means the sentiment although small really stands out.


Finally the Sizzix Bigz Stags Head By Craft Asylum has been used to create a modern card.  With some simple matting and layering it adds a bold finish to the card.  The sentiment has again been cut from the Sizzix Thinlits Die set - Warm Winter Wishes By Craft Asylum.  This die is great as you can use the actual letters or the negative which I have done here.


I hope these give you a little inspiration for your Christmas makes this year.  You could even create tags and wrapping to match!

I will catch up with you all next week.

Katie 


Monday 10 August 2015

Craft demo, Craft Asylum on the road!


Last month I was invited to demonstrate the latest dies from Craft Asylum for Sizzix at a local shop. I enjoy so much demonstrating how I use the dies and this was no exception.

As well as some new samples, I brought all the samples I had made for this blog as you can see at the top photo.


There was a card competition in which I was one of the judges. Its was nice to be invited to judge! There were great entries and I loved how the Board was decorated with the Tribal dies.

And while I was demonstrated I made a few cards. Last minute I remembered to take a couple of photos with my mobile.


To make the card above I used:

Sizzix Thinlits Die Set 5PK - Intricate Tribal Florals
Sizzix Bigz Die - Tribal Florals
Sizzix Textured Impressions Embossing Folder - Botany Decoration
Sizzix Accessory - Embossing Diffuser 3PK, Set #1

I embossed the front of the card using the Textured Impressions folder but instead of using the two clear plates, I just used the circle diffuser from the Embossing Diffuser 3PK.
I coloured then white card using distress inks.
I die cut the solid flowers using solid card using the Bigz Die - Tribal Florals and then the Intricate Tribal Florals using white card. I layered them and glued to the front of the card. Finally I added some crystals.


To make the card above I used three dies again:

To make this quick and easy card, I simply die cut the chevron out of three colours (salmon pink, light and dark green).
Then I die cut the flowers, using white card to die cut the African Florals and the pink and green (centre) using the matching Intricate African Florals. I glue those flowers together and attach them to the front of the card using foam pads.
Simple but elegant!

I hope you like this two different cards!


Saturday 8 August 2015

Hello Deer Card


Hello...

I hope you are all enjoying the summer.  It's been a lovely few days here and the beaches are so busy but as a designer summer bring Christmas projects, so I am here today to share one of the new Craft Asylum dies with you - Proud Deer.  I love this little fella.  It is one of those dies that I know I will use time and time again.  It will never date and coordinates beautifully with any collection.


This year I am challenging myself to make some Christmas cards from non Christmas themed papers.  I have so many pretty papers and it is a shame not to put them to good use, so I am adapting some into my Christmas makes.


For this card I have used the Home Sweet Home 6 x 6" Paper Pad and although the colours aren't traditional Christmas themed with the help of the die it can still produce a real Christmas feel.

Materials:
Home Sweet Home 6 x 6" Paper Pad
Sizzix Thinlits Die Proud Deer By Craft Asylum
Sizzix Thinlits Winter Wishes By Craft Asylum
Framelits Circles
White Card
Kraft Card

Instructions:
1.  Trim a card blank 11.5cm x 18cm.  Trim kraft card and another panel if white cardstock slightly smaller and layer together.

2.  Trim 3 banners from coordinating patterned papers and adhere centrally onto the card.

3.  Trim a strip of kraft card 4cm to fit along the card.  Layer a panel of white.

4.  Doe cut 2 circle and adhere together.  Die cut the Deer and attach to the circle.

5.  Adhere the die cut 'Hello' to the top of the banner and using a computer print the word 'deer'.  Trim and ink the edges.  Attach behind the circle.

6.  Add some adhesive stones to the edge of the banner to complete.

Of course for a different occasion you could simply swap the deer for a butterfly of flower or why not add the Cute Owl from Craft Asylum?   The possibilities are endless but this is a good card sketch to follow when you are stuck for inspiration.


Have a great week.


Katie 

Saturday 1 August 2015

Tribal Heart Candy Card


Hello..

I hope you are enjoying your weekend.

Today I have a simple card to share with you using the Candy Collection.  This collection works so well with a white card as it really brings out the colours.


Here I have used the papers from the 6 x 6" Candy Paper Pad and the elements from the 12 x 12" Candy Paper Pad.  The main focal point is the Heart which is cut from the Sizzix Bigz Die Tribal Hearts By Craft Asylum.  It has been layered to create a colourful effect.

To embellish I have added some adhesive stones.  The heart and 'enjoy' sentiment have been adhered using 3D foam pads as this helps the main focal point stand out from the rest of the card.

This card is perfect for so many occasions and with its bright colours and pretty elements it will be gratefully received.

Have a lovely weekend.

Katie