Monday 27 April 2015

Hello Sunshine Gift Box


Hello ...

I hope you are all well.

Today I want to share a little gift box that I have made using the Hello Sunshine Collection.

It is really handy to have a quick method of making up gift boxes to wrap those little gifts we give.


To create this box follow these instructions:

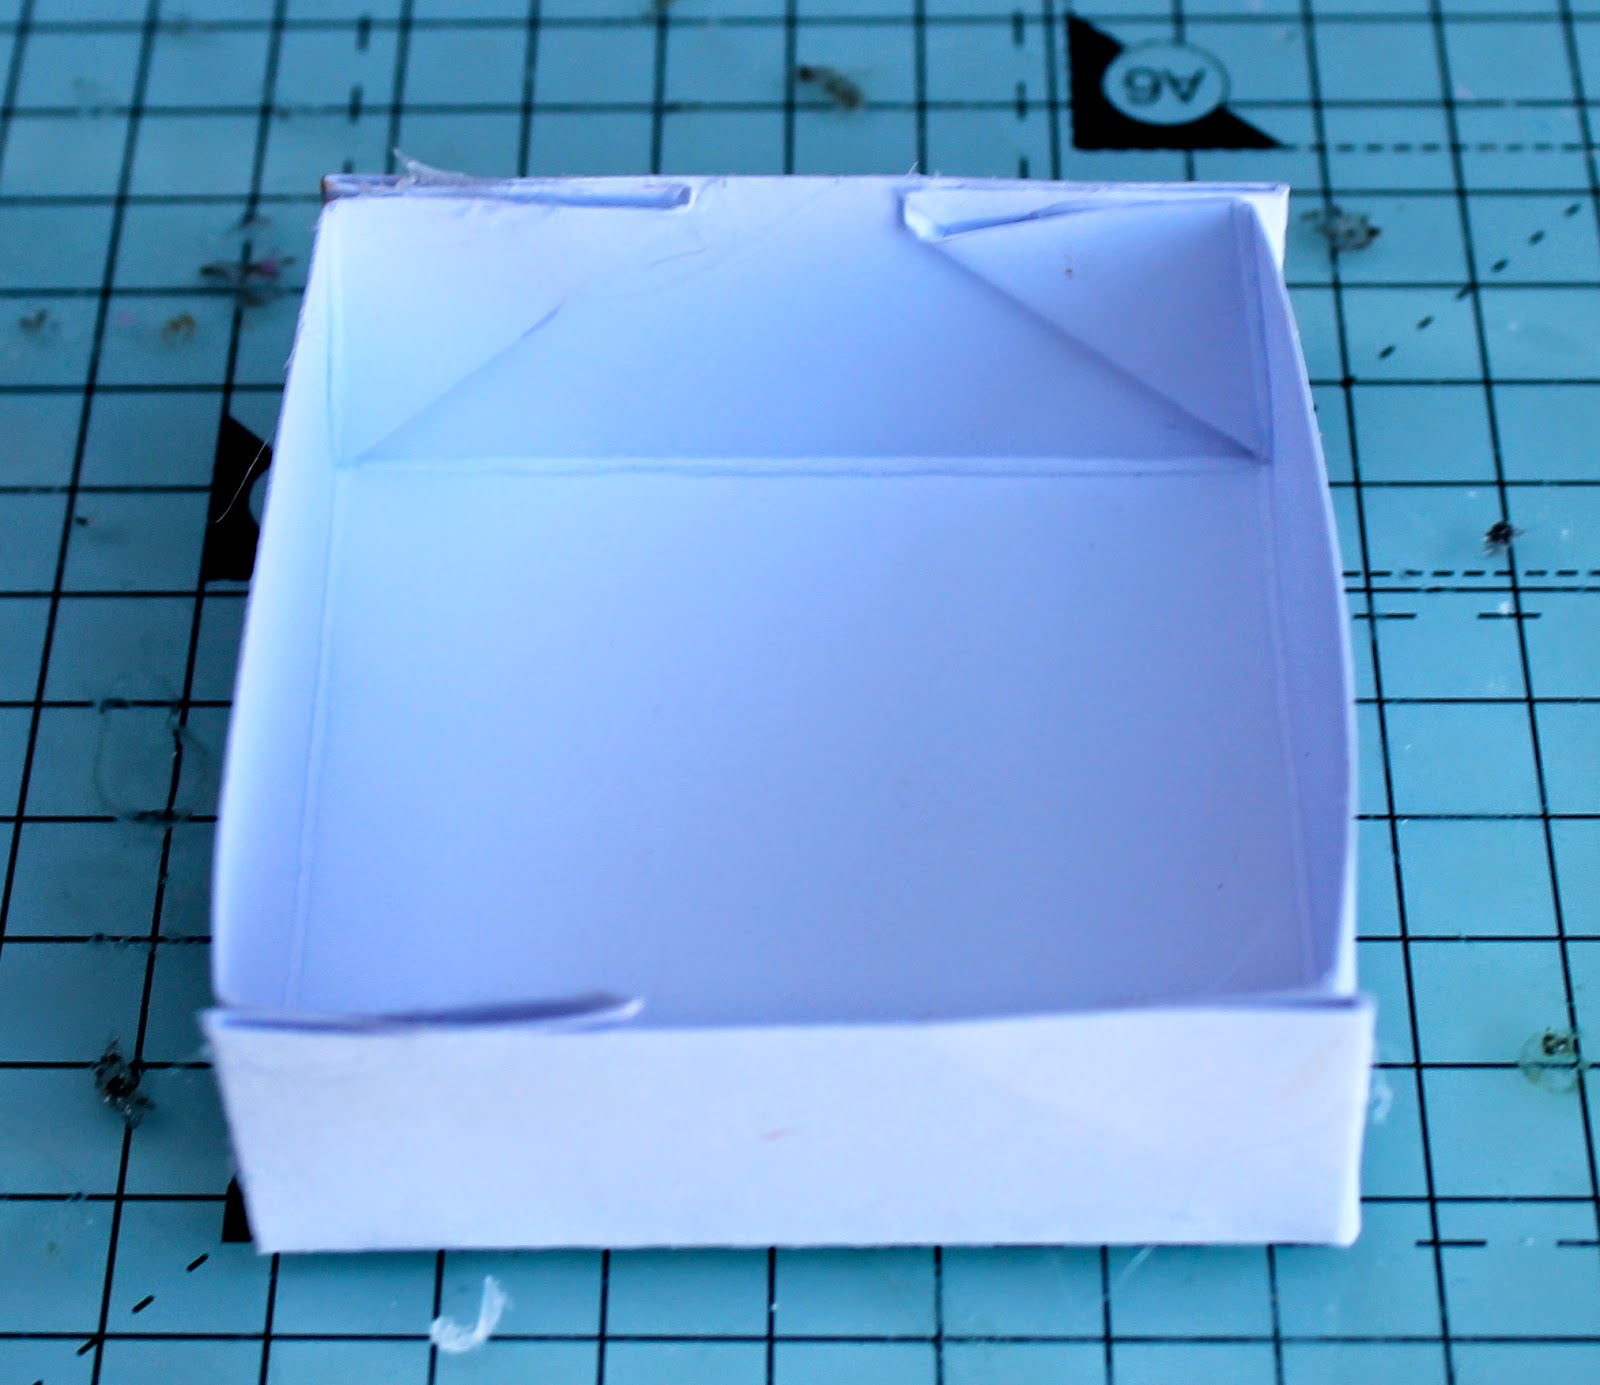
1.  Take a piece of white cardstock 4 1/2" x 4 1/2".  Score at each edge 1" in and then score from corner to corner in the small square as shown in the picture.


2.  Make this into a tray by folding the score lines and adhering with double sided tape.  This is not going to be seen so don't worry too much about how it looks.  It just acts as a base for the box.


3.  Trim your chosen patterned paper 5 1/2 x 11" and add double sided tape to one long edge and one short edge.

4.  Slowly and carefully wrap this around the base of the box until it forms a tube.  Adhere using the double sided strip you put on.

5.  Trim a 1" strip of coordinating paper and adhere to the base of the box.  Add the gift and seal the top.

6.  Die cut 2 circles and adhere to the top of the box.  Punch a hole and thread through the twine.

7.  Take the elements from the 12 x 12" Paper Pad and adhere to the front of the box. Add a brad.

Materials:
Hello Sunshine Embellishment Set
Framelits Dies - Circle
Twine
White Cardstock 


I hope you find this a useful little project to have.

Enjoy your week.

Katie 


Monday 20 April 2015

A Candy Layout


I am still enamoured of the lovely colours of the Candy Craft Asylum collection. I have lovely photos from 2014 with some of my favourite people, and I find that it is important to celebrate them. What better than a layout combining both loves?
Simple but love all the small details.


I used: Craft Asylum Candy 12"x12" Paper Pad, Craft Asylum Candy 6"x6" Paper Pad, Sizzix Thinlits Die Set 9PK - Layering Frames; a Big Shot die cutting machine, white card and adhesives.

I attached a piece of the chevron paper to the top of the white card. Then I cut a thin chevron strip using another of the 12 x 12 papers. I then used the banner from the 12 x 12 die cut sheet.


I then die cut the layering frames using the plain papers from the 6 x 6. I layer them with foam pads and added the sentiment from the die cut sheet of the 12 x 12 sheet.


I folded one of the layering frames to create some texture and glued it to the banner. I also die cut another of the layering frames and attach it to the left. 
Top of the photo I cut two identical stripes and then placed them mirrored.
Finally I added some crystals to decorate two opposite corners.

Simple, but great to celebrate those simple perfect moments with my friend!


Saturday 18 April 2015

Sweet As Candy Card


Hello ...

This week has been chaos so the card I am going to share with you is perfect for my week!

Enjoy Everyday Moments.

I am sure we are all guilty of rushing around and not enjoying what we have right now.  This is what I love about each of the Craft Asylum ranges ... they all have those little words to make us stop and think or cheer up a friend.  Sometimes we send cards for no reason or to make someones day a bit brighter, so words like this are perfect!


This is a very simple yet effective card and the white embossed background is perfect for setting off the colours.

To make this card emboss the bottom section using the Sizzix Textured Impressions Candy Hearts.  Take the border from the Candy 12 x 12 Paper Pad and adhere using 3D foam pads where the embossing meets the plain card.  Add the two pennants again from the Candy 12 x 12" Paper Pad.  Trim the 'Everyday moments' and 'today' from the Candy 6 x 6" Paper Pad and adhere onto the card.   Add a few adhesive stones to embellish.


I'm actually going to pop this card on my shelf in my studio to remind me to enjoy the everyday moments, with its bright colours and cute hearts it will brighten up any room.

Have a great week .... and remember to enjoy those everyday moments!

Katie 

Saturday 11 April 2015

Candy Border Strips


Hello ...

I hope this post finds you well and you have enjoyed the Easter break.

Today I have a card to share featuring the new Candy range.  The colours in this range are gorgeous and so fresh and clean.


To make this card I have used the Candy 6 x 6" Paper Pad.  I have taken the plain papers and using the Sizzix Thinlits Decorative Trim I have die cut 8 strips and adhered them onto white cardstock.  This has been mounted into a card blank covered with the pink paper.  To finish I have added the 'lovely' element from the Candy 12 x 12" Paper Pad.  To attach I punched holes in the sides and threaded through the twine.

This is a great way to use up those strips of paper and a great card to keep incase a special occasion pops up.

Until next time ...
Happy crafting! 

Monday 6 April 2015

Candy! Pretty cards!


As soon as i saw this collection I knew I was going to love it. Love the soft pinks and turquoises mix in with greys, such a soft lovely combination. 


For this card I used Craft Asylum Candy 6"x6" Paper PadCandy 12"x12" Paper Pad, and Sizzix Thinlits Die Set 2PK - Decorative Trim (to die cut you will need a Big Shot die cutting machine or similar); plus some white card, adhesives and little crystals.

I used the bubbles background paper and trimmed to size of my blank card, just a bit smaller, so that a white edges shows around. Then I used the hearts decorative trim die to cut it out of pink card and layered over grey paper, I then attached it the card.


I took the "smile" sentiment as well as the banner from the 12x12 pad and layered them on to the card with foam pads. Finally I added the crystals to add some sparkle!

Once I did that one, I couldn't stop myself and I had to do another one, this one even quicker card.


For this card I used Craft Asylum Candy 12"x12" Paper Pad, Candy 6"x6" Paper Pad, Candy Clear Stamp Set 22pcs; plus some white card, black ink, a circle 7/8" punch, an acrylic block, adhesives and little crystals.

I simply placed two of already die cut strips of the 12x12 pad across the front of the card. Then I placed the banner and heart card - both also from the 12x12 pad - and glue them. To add the sentiment, I stamp the message onto white card using black Versafine ink to give me the best results. Once the ink was dry I die cut it using the 7/8"circle punch (1" will work too) and attach it to the card.

Simple cardmaking: my favourite and Craft Asylum is perfect for it!


Saturday 4 April 2015

Circular Meadow Sweet Card


Good Morning,

I hope you are enjoying the long Easter weekend.  They have forecast some lovely weather so with that in mind I want to share a bright, spring card with you today.  Made using the Meadow Sweet collection and a few simple folds this card will make anyone smile!


To make tis card I have die cut a scalloped circle into a card blank with part of the die covering the fold.  This will then cut a circular card blank.  The top scalloped circle then needs to be folded and another scalloped circle the same size adhered to the fold to create the easel element.
Both the bottom and the top have been covered with patterned paper from the Meadow Sweet 6 x 6" Paper Pad.  The sentiment again from the Meadow Sweet 6 x 6" Paper Pad has been trimmed and a brad from the Meadow Sweet Embellishment Set has been used to help the word 'smile' stand out.  Finally I have used the Sizzix Thinlits Meadow Butterfly Die to create the butterfly.  It has been cut from various coordinating patterned papers and glitter card.


So there you have it.  A fun card for a spring occasion.  


Have a great weekend.

Katie